I get asked on a regular basis how to do a simple Universal File Mover (UFM) setup on 2 servers. It is actually very straight forward and I will run through an example in this blog posting.
In this example, the following servers are used:
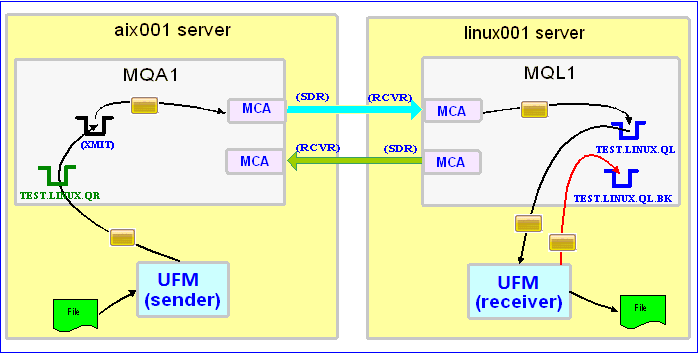
– aix001 is an AIX server with WMQ Server and UFM software installed
– linux001 is a Linux server with WMQ Server and UFM software installed
In this example, the following queue managers are used:
– MQA1 is a queue manager residing on a AIX (aix001) server (sender)
– MQL1 is a queue manager residing on a Linux (linux001) server (receiver)
– TEST.LINUX.QL and TEST.LINUX.QL.BK are local queues defined in queue manager MQL1 (receiver)
– TEST.LINUX.QR is a remote queue defined in queue manager MQA1 (sender)
If you do not know how to define/setup communication between 2 queue managers then follow the instructions in this blog posting:
https://www.capitalware.com/rl_blog/?p=509
Step #1: On the Linux server, in the UFM install directory, create a file called ufm_receive_test_1.xml and copy the following into the file:
<?xml version="1.0" encoding="ISO-8859-1"?>
<!DOCTYPE UFM_Workflow SYSTEM "UFM_Workflow.dtd">
<UFM_Workflow>

  <Actions>
    <MQReceive getwithconvert="Y" run="D">
      <MQ>
        <QMgrName>MQL1</QMgrName>
        <QueueName>TEST.LINUX.QL</QueueName>
        <BackOutQName>TEST.LINUX.QL.BK</BackOutQName>
      </MQ>
      <Default>
         <Directory override="Y">/home/roger/UFM/</Directory>
      </Default>
    </MQReceive>
  </Actions>

</UFM_Workflow>
When UFM is started, it will run as a daemon (run=”D”) and use a backout queue called TEST.LINUX.QL.BK just in case there is an issue with a message. UFM will use ‘get with convert’ option when retrieving the messages. UFM will override the message’s specified directory and use the one provided. Either create /home/roger/UFM/ directory on your Linux server or use a directory that already exist on your Linux server.
Step #2: On the Linux server, start UFM to receive the file transfers:
./ufm.sh ufm_receive_test_1.xml &
Step #3: On the AIX server, create a file in the data directory called test.txt and put a simple text message in the file (i.e. This is a test message.)
Step #4: On the AIX server, in the UFM install directory, create a file called ufm_send_test_1.xml and copy the following into the file:
<?xml version="1.0" encoding="ISO-8859-1"?>
<!DOCTYPE UFM_Workflow SYSTEM "UFM_Workflow.dtd">
<UFM_Workflow>

  <Actions>
    <MQSend delete="N" format="S">
      <File>data/test.txt</File>
      <MQ>
        <QMgrName>MQA1</QMgrName>
        <QueueName>TEST.LINUX.QR</QueueName>
      </MQ>
      <Remote>
        <Directory>/var/mqm/</Directory>
      </Remote>
    </MQSend>
  </Actions>

</UFM_Workflow>
When UFM is started, it will send the specified file and mark the message’s MQMD format as ‘string’.
Step #5: On the AIX server, start UFM to send the file:
./ufm.sh ufm_send_test_1.xml
UFM will start and put the file as a message to the specified queue then terminate.
Step #6: On the Linux server, verify that the test file (i.e. test.txt) was put into the /home/roger/UFM/ directory or whatever directory you specified in the ufm_receive_test_1.xml file.
Step #7: Finally, we need to stop UFM daemon that is running on the Linux server. In the UFM install directory, create a file called ufm_putquit_test_1.xml and copy the following into the file:
<?xml version="1.0" encoding="ISO-8859-1"?>
<!DOCTYPE UFM_Workflow SYSTEM "UFM_Workflow.dtd">
<UFM_Workflow>
  <Actions>
    <MQPutQuit>
      <MQ>
        <QMgrName>MQL1</QMgrName>
        <QueueName>TEST.Q1.QL</QueueName>
      </MQ>
    </MQPutQuit>
  </Actions>
</UFM_Workflow>
Step #8: On the Linux server, run UFM with the PutQuit action:
./ufm.sh ufm_putquit_test_1.xml
Hopefully, that will help new users of UFM to get up and running in minutes. In the future, I will post more complex UFM examples.
Regards,
Roger Lacroix
Capitalware Inc.
One Response to Simple File Transfer using Universal File Mover (How To #1)