I sometimes get a question like “can UFM be used to send files as MQ messages to a 3rd party application”. The answer is yes. In this blog posting, I will show how to do a file transfer in “client mode” when UFM connects to the queue manager.
Things to note: UFM stores the directory name, file name and job name in the MQMD if the following is true:
- Directory name is less than 33 characters
- File name is less than 33 characters
- Job name is less than 25 characters
If any field exceeds these length values then UFM will create UFM_Msg XML and insert it into the message data. Hence, this will be a problem for the 3rd party application as they will not expect it.
Therefore, the sample below will explicitly set the directory name and file name using the Remote element to make sure the field sizes are small and that the UFM_Msg XML is not created.
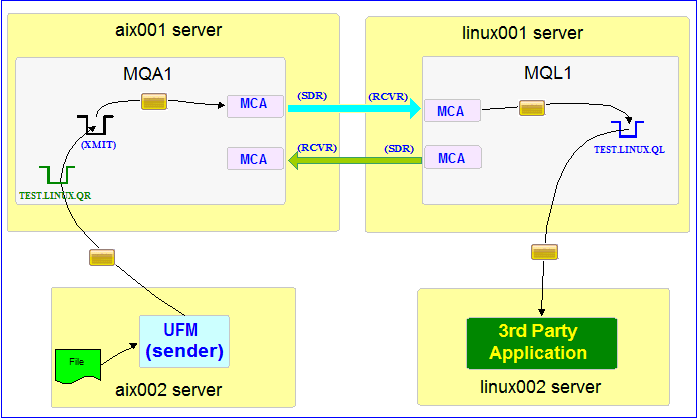
In this example, the following servers are used but they only have WebSphere MQ (WMQ) Client installed (no queue managers):
– aix002 is an AIX server with WMQ Client and UFM software installed
– linux002 is a Linux server with WMQ Client and UFM software installed
In this example, the following queue managers are used:
– MQA1 is a queue manager residing on a AIX (aix001) server (sender)
– MQL1 is a queue manager residing on a Linux (linux001) server (receiver)
– TEST.LINUX.QL is a local queue defined in queue manager MQL1 (receiver)
– TEST.LINUX.QR is a remote queue defined in queue manager MQA1 (sender)
If you do not know how to define/setup communication between 2 queue managers then follow the instructions in this blog posting:
https://www.capitalware.com/rl_blog/?p=509
Step #1: On the aix002 server, create a file in the mq directory called mqa1.xml and copy the following into the file:
<?xml version="1.0" encoding="ISO-8859-1"?>
<!DOCTYPE UFM_MQ SYSTEM "UFM_MQ.dtd">
<UFM_MQ>
    <QMgrName>MQA1</QMgrName>
    <QueueName>TEST.LINUX.QR</QueueName>
    <Hostname>aix001</Hostname>
    <ChannelName>SYSTEM.DEF.SVRCONN</ChannelName>
    <Port>1414</Port>
    <UserID>tester</UserID>
</UFM_MQ>
The mqa1.xml (UFM_MQ XML) file describes how to connect to the remote MQA1 queue manager on server aix001. The connection will use UserID of tester. If you do not have that UserID defined on the aix001 server then use a UserID that is defined.
Step #2: On the aix002 server, create a file in the data directory called test.txt and put a simple text message in the file (i.e. This is a test message.)
Step #3: On the AIX server, in the UFM install directory, create a file called ufm_send_test_7.xml and copy the following into the file:
<?xml version="1.0" encoding="ISO-8859-1"?>
<!DOCTYPE UFM_Workflow SYSTEM "UFM_Workflow.dtd">
<UFM_Workflow>

  <Actions>
    <MQSend delete="N" format="S">
      <File>data/test.txt</File>
      <MQ>
        <MQFile>mqa1.xml</MQFile>
      </MQ>
      <Remote>
        <Directory>/junk/</Directory>
        <FileName>short.txt</FileName>
      </Remote>
    </MQSend>
  </Actions>

</UFM_Workflow>
When UFM is started, it will send the specified file and mark the message’s MQMD format as ‘string’.
Step #4: On the aix002 server, start UFM to send the file:
./ufm.sh ufm_send_test_7.xml
UFM will start and put the file as a message to the specified queue then terminate.
Step #5: On the linux002 server, run the 3rd party application to retrieve the messages from the queue.
This blog demonstrates how to use UFM to send files via MQ to a 3rd party application.
Regards,
Roger Lacroix
Capitalware Inc.