In this blog posting, I will show you how to send an extremely large file (i.e. 1GB) when connecting to the queue manager in “client mode”. From a user’s perspective, sending a 1GB file is done exactly the same way as sending a 1KB file.
For files greater than 4MB, UFM’s MQSend Action use MQ’s segmentation feature. The large file is broken up into segments and send via MQ. The MQReceive Action will get and write each message segment to the target file.
If the message data does not need to be converted between platforms, then I strongly suggest that UFM’s compression feature be used on the MQSend Action. Using compression will cause the messages to move through your MQ environment faster and use less resources. Depending on the original file contents, the compression may achieve 5 to 1 compression or as high as 40 to 1 compression ratio.
Note: You can combine both encryption and compression when sending files using UFM.
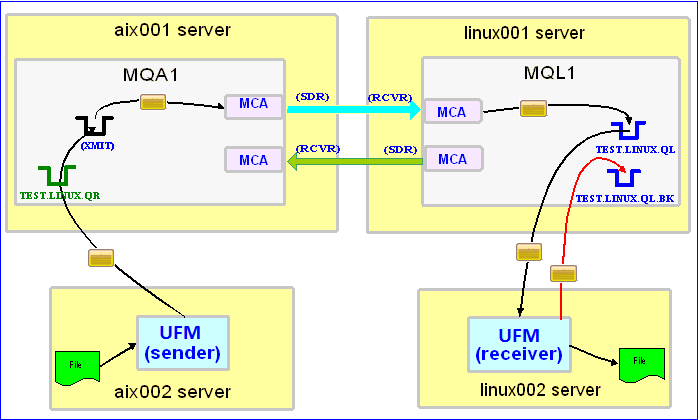
In this example, the following servers are used but they only have WebSphere MQ (WMQ) Client installed (no queue managers):
– aix002 is an AIX server with WMQ Client and UFM software installed
– linux002 is a Linux server with WMQ Client and UFM software installed
In this example, the following queue managers are used:
– MQA1 is a queue manager residing on a AIX (aix001) server (sender)
– MQL1 is a queue manager residing on a Linux (linux001) server (receiver)
– TEST.LINUX.QL and TEST.LINUX.QL.BK are local queues defined in queue manager MQL1 (receiver)
– TEST.LINUX.QR is a remote queue defined in queue manager MQA1 (sender)
If you do not know how to define/setup communication between 2 queue managers then follow the instructions in this blog posting:
https://www.capitalware.com/rl_blog/?p=509
Step #1: On the linux002 server, create a file in the mq directory called mql1.xml and copy the following into the file:
<?xml version="1.0" encoding="ISO-8859-1"?>
<!DOCTYPE UFM_MQ SYSTEM "UFM_MQ.dtd">
<UFM_MQ>
    <QMgrName>MQL1</QMgrName>
    <QueueName>TEST.LINUX.QL</QueueName>
    <Hostname>linux001</Hostname>
    <ChannelName>SYSTEM.DEF.SVRCONN</ChannelName>
    <Port>1414</Port>
    <UserID>tester</UserID>
</UFM_MQ>
The mql1.xml (UFM_MQ XML) file describes how to connect to the remote MQL1 queue manager on server linux001. The connection will use UserID of tester. If you do not have that UserID defined on the linux001 server then use a UserID that is defined.
Step #2: On the linux002 server, in the UFM install directory, create a file called ufm_receive_test_9.xml and copy the following into the file:
<?xml version="1.0" encoding="ISO-8859-1"?>
<!DOCTYPE UFM_Workflow SYSTEM "UFM_Workflow.dtd">
<UFM_Workflow>

  <Actions>
    <MQReceive run="D" >
      <MQ>
        <MQFile>mql1.xml</MQFile>
        <BackOutQName>TEST.LINUX.QL.BK</BackOutQName>
      </MQ>
      <Default>
         <Directory override="Y">/home/roger/UFM/</Directory>
      </Default>
    </MQReceive>
  </Actions>

</UFM_Workflow>
When UFM is started, it will run as a daemon (run=”D”) and use a backout queue called TEST.LINUX.QL.BK just in case there is an issue with a message. UFM will override the message’s specified directory and use the one provided. Either create /home/roger/UFM/ directory on your Linux server or use a directory that already exist on your Linux server.
Note: There were no options specified for UFM’s MQReceive Action to use the decompression feature. The MQReceive Action will automatically detect if the incoming message has been compressed or not and take the appropriate action.
Step #3: On the linux002 server, start UFM to receive the file transfers:
./ufm.sh ufm_receive_test_9.xml &
Step #4: On the aix002 server, in the mq directory, create a file called mqa1.xml and copy the following into the file:
<?xml version="1.0" encoding="ISO-8859-1"?>
<!DOCTYPE UFM_MQ SYSTEM "UFM_MQ.dtd">
<UFM_MQ>
    <QMgrName>MQA1</QMgrName>
    <QueueName>TEST.LINUX.QR</QueueName>
    <Hostname>aix001</Hostname>
    <ChannelName>SYSTEM.DEF.SVRCONN</ChannelName>
    <Port>1414</Port>
    <UserID>tester</UserID>
</UFM_MQ>
The mqa1.xml (UFM_MQ XML) file describes how to connect to the remote MQA1 queue manager on server aix001. The connection will use UserID of tester. If you do not have that UserID defined on the aix001 server then use a UserID that is defined.
Step #5: On the aix002 server, I have a file called giant_test.txt that is 1GB (1024MB) in size. Use your own extremely large file or create an extremely large file called giant_test.txt.
Step #6: On the AIX server, in the UFM install directory, create a file called ufm_send_test_9.xml and copy the following into the file:
<?xml version="1.0" encoding="ISO-8859-1"?>
<!DOCTYPE UFM_Workflow SYSTEM "UFM_Workflow.dtd">
<UFM_Workflow>

  <Actions>
    <MQSend delete="N" format="Z" >
      <File>data/giant_test.txt</File>
      <MQ>
        <MQFile>mqa1.xml</MQFile>
      </MQ>
      <Remote>
        <Directory>/var/mqm/</Directory>
      </Remote>
    </MQSend>
  </Actions>

</UFM_Workflow>
When UFM is started, it will determine that it needs to use MQ’s segmentation feature. In the MQSend Action above, I have used the compress feature (format=”Z”), hence, before a message segment is sent, UFM will compress the message segment.
Step #7: On the aix002 server, start UFM to send the file:
./ufm.sh ufm_send_test_9.xml
UFM will start, put the message segments to the specified queue then terminate.
Step #8: On the linux002 server, verify that the test file (i.e. giant_test.txt or whatever you called it) was put into the /home/roger/UFM/ directory or whatever directory you specified in the ufm_receive_test_9.xml file.
Step #9: Finally, we need to stop UFM daemon that is running on the linux002 server. In the UFM install directory, create a file called ufm_putquit_test_9.xml and copy the following into the file:
<?xml version="1.0" encoding="ISO-8859-1"?>
<!DOCTYPE UFM_Workflow SYSTEM "UFM_Workflow.dtd">
<UFM_Workflow>
  <Actions>
    <MQPutQuit>
      <MQ>
        <MQFile>mql1.xml</MQFile>
      </MQ>
    </MQPutQuit>
  </Actions>
</UFM_Workflow>
Step #10: On the linux002 server, run UFM with the MQPutQuit action:
./ufm.sh ufm_putquit_test_9.xml
This blog demonstrates how easy it is to send an extremely large file using UFM via MQ. Remember, when possible, use the compression option for the MQSend Action and you can combine both encryption and compression when sending files (any size) using UFM via MQ.
Regards,
Roger Lacroix
Capitalware Inc.