IBM has just released FixPack 7.0.1.10 for WebSphere MQ.
http://www.ibm.com/support/docview.wss?uid=swg21636042
Regards,
Roger Lacroix
Capitalware Inc.
IBM has just released FixPack 7.0.1.10 for WebSphere MQ.
http://www.ibm.com/support/docview.wss?uid=swg21636042
Regards,
Roger Lacroix
Capitalware Inc.
Using MQAUSX and MQCE together is only a little more complex than uses a single MQ exit. The same software is installed on the server regardless if it is acting as a “server” or “client”. So, let’s go through a setup and test of MQAUSX and MQCE on 2 Solaris servers where 1 Solaris server is the “server-side” and the other Solaris server is the “client-side” of the test which will use a client-side encrypted file.
Information:
– Server 1 is running Solaris SPARC v9 (64-bit) with a queue manager called BIZI.QM.TST on WMQ v7.0.1.0
– Server 2 is running Solaris SPARC v10 (64-bit) and will run the MQ client application with WMQ v7.1.0.0.
Step #1: Install the MQAUSX and MQCE on both servers. Please follow instructions in the manual, the following is the short form:
On Solaris 9, use mqausx_solaris64.tar and mqce_solaris64.tar files and then run setausx.sh and setmqce.sh shell scripts as root.
On Solaris 10, use mqausx_solaris10_64.tar and mqce_solaris10_64.tar files and then run setausx.sh and setmqce.sh shell scripts as root.
Step #2: On Solaris 9 server, copy the Capitalware supplied License files (mqausx_licenses.ini and mqce_licenses.ini) for both MQAUSX and MQCE to the install directory. i.e. /var/mqm/exits64/
Note: The client-side MQAUSX and MQCE components do NOT require a License file.
Step #3: On Solaris 9 server, by default, MQAUSX will authenticate against the Local OS. If you want to authenticate against a different target then update the IniFile to reflect it (please follow the instructions as per the manual). For MQCE, the AES default key size is 128 bits. You can update the IniFile to use 128 or 192 or 256 bit.
Step #4: On Solaris 9 server, define a SVRCONN channel (‘LIOR.CHL’) in queue manager ‘BIZI.QM.TST’ to use both MQAUSX and MQCE:
DEFINE CHANNEL ('LIOR.CHL') CHLTYPE(SVRCONN) +
       TRPTYPE(TCP) +
       SCYEXIT('/var/mqm/exits64/mqausx(SecExit)') +
       SCYDATA('mqausx.ini') +
       RCVEXIT('/var/mqm/exits64/mqce(CE)') +
       RCVDATA('mqce.ini') +
       SENDEXIT('/var/mqm/exits64/mqce(CE)') +
       SENDDATA('mqce.ini') +
       REPLACE
Note: Because I did not specify the path for SCYDATA, RCVDATA and SENDDATA attributes of the channel, MQAUSX and MQCE will look for the specified IniFile in the install directory.
Step #5: On Solaris 10 server, I will create a client-side encrypted file for the client application to use.
enc_clnt -u tester -p abc123 -f /export/home/tester/secure/tester.enc
Note: The client-side encrypted filename can be called anything so long as it has a file extension of “enc”.
I purposely made the path and filename of the client-side encrypted file very long. It is 37 characters long. For MQ channel exits, IBM has restricted the “Data” fields (security/send/receive) to a maximum of 32 characters.
This IBM 32 character restriction for the “Data” field is the number 1 reason why people have problems when dealing with channel exits.
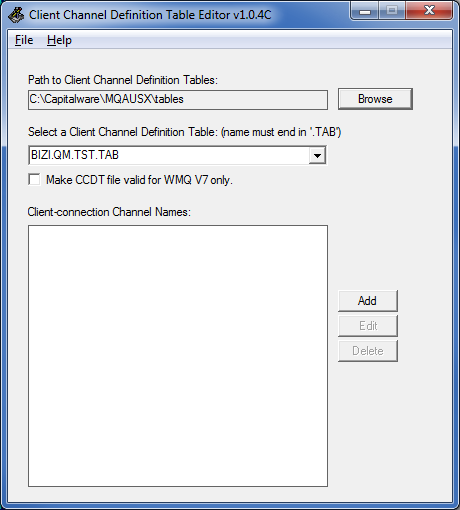
Step #6: On a Windows PC, create the CCDT (Client Channel Definition Table) file using the CCDTE program. I like to call the CCDT file by the name of the queue manager. For this example, the queue manager is called BIZI.QM.TST, so the CCDT file will be called ‘BIZI.QM.TST.TAB’.
Now input the channel name, connection name and queue manager name then select the Unix version of the security and Send/Receive exits from the dropdown.
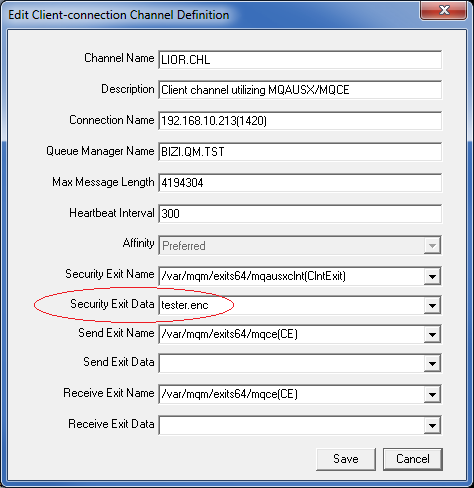
Please review the “Security Exit Data” field in the above screen-shot. The full path and filename is “/export/home/tester/secure/tester.enc” but it is longer than 32 characters. Therefore, I will just inputted the filename of “tester.enc” and will use the MQAUSXCLNT_HOME environment variable to specify the path to the client-side encrypted file.
Step #7: Now copy the CCDT file (‘BIZI.QM.TST.TAB’) from the Windows PC to the Solaris 10 server. Make sure you copy the file as ‘binary’. In this example, I will copy the CCDT to /export/home/tester/ directory on the Solaris 10 server.
Step #8: On Solaris 10 server, we need set some MQ environment variables:
unset MQSERVER
export MQCHLLIB=/export/home/tester
export MQCHLTAB=BIZI.QM.TST.TAB
Note: MQCHLLIB environment has 2 “L”s so be care when typing it.
Unset MQAUSX environment variables from the previous test and then set the MQAUSXCLNT_HOME environment variable:
 unset MQAUSX_UID
unset MQAUSX_PWD
export  MQAUSXCLNT_HOME=/export/home/tester/secure/
Step #9: On Solaris 10 server, now that the environment variables are set, time to do a test. I will use the amqsputc and amqsgetc MQ sample programs:
Let’s put 1 message on the queue:
/opt/mqm/samp/bin/amqsputc TST1  BIZI.QM.TST
Sample AMQSPUT0 start
target queue is TST1
this is a test message #2

Sample AMQSPUT0 end
Now, let’s retrieve that message:
 /opt/mqm/samp/bin/amqsgetc TST1  BIZI.QM.TST
Sample AMQSGET0 start
message
no more messages
Sample AMQSGET0 end
That’s it – pretty straightforward. It is very easy to have both channel authentication and message encryption over the channel.
I strongly recommend that people use client-side encrypted file and place the file in a directory that only the appropriate user has permission to access the client-side encrypted file.
Regards,
Roger Lacroix
Capitalware Inc.
Using MQAUSX and MQCE together is only a little more complex than uses a single MQ exit. The same software is installed on the server regardless if it is acting as a “server” or “client”. So, let’s go through a setup and test of MQAUSX and MQCE on 2 Solaris servers where 1 Solaris server is the “server-side” and the other Solaris server is the “client-side” of the test.
Information:
– Server 1 is running Solaris SPARC v9 (64-bit) with a queue manager called BIZI.QM.TST on WMQ v7.0.1.0
– Server 2 is running Solaris SPARC v10 (64-bit) and will run the MQ client application with WMQ v7.1.0.0.
Step #1: Install the MQAUSX and MQCE on both servers. Please follow instructions in the manual, the following is the short form:
On Solaris 9, use mqausx_solaris64.tar and mqce_solaris64.tar files and then run setausx.sh and setmqce.sh shell scripts as root.
On Solaris 10, use mqausx_solaris10_64.tar and mqce_solaris10_64.tar files and then run setausx.sh and setmqce.sh shell scripts as root.
Step #2: On Solaris 9 server, copy the Capitalware supplied License files (mqausx_licenses.ini and mqce_licenses.ini) for both MQAUSX and MQCE to the install directory. i.e. /var/mqm/exits64/
Note: The client-side MQAUSX and MQCE components do NOT require a License file.
Step #3: On Solaris 9 server, by default, MQAUSX will authenticate against the Local OS. If you want to authenticate against a different target then update the IniFile to reflect it (please follow the instructions as per the manual). For MQCE, the AES default key size is 128 bits. You can update the IniFile to use 128 or 192 or 256 bit.
Step #4: On Solaris 9 server, define a SVRCONN channel (‘LIOR.CHL’) in queue manager ‘BIZI.QM.TST’ to use both MQAUSX and MQCE:
DEFINE CHANNEL ('LIOR.CHL') CHLTYPE(SVRCONN) +
       TRPTYPE(TCP) +
       SCYEXIT('/var/mqm/exits64/mqausx(SecExit)') +
       SCYDATA('mqausx.ini') +
       RCVEXIT('/var/mqm/exits64/mqce(CE)') +
       RCVDATA('mqce.ini') +
       SENDEXIT('/var/mqm/exits64/mqce(CE)') +
       SENDDATA('mqce.ini') +
       REPLACE
Note: Because I did not specify the path for SCYDATA, RCVDATA and SENDDATA attributes of the channel, MQAUSX and MQCE will look for the specified IniFile in the install directory.
Step #5: On a Windows PC, create the CCDT (Client Channel Definition Table) file using the CCDTE program. I like to call the CCDT file by the name of the queue manager. For this example, the queue manager is called BIZI.QM.TST, so the CCDT file will be called ‘BIZI.QM.TST.TAB’.
Now input the channel name, connection name and queue manager name then select the Unix version of the security and Send/Receive exits from the dropdown.
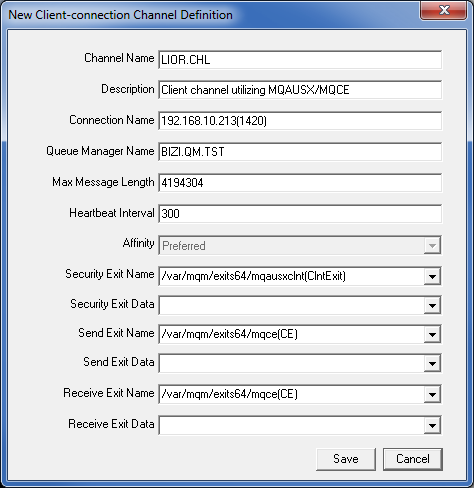
As you can see, I did not set any values for Security Exit Data, Send Exit Data or Receive Exit Data. This means that the default values (client-side) for MQAUSX and MQCE will be used.
Note: For MQAUSX client-side on Windows, the user will be presented with a popup window to input their user credentials, if the Security Exit Data field is empty. On Unix/Linux, there is no popup window hence if the Security Exit Data field is empty then the user must set the MQAUSX_UID and MQAUSX_PWD environment variables.
It would be far better to use the enc_clnt program to create the encrypted user credentials in a client-side encrypted IniFile and then set the location of the client-side encrypted IniFile in the Security Exit Data field.
Step #6: Now copy the CCDT file (‘BIZI.QM.TST.TAB’) from the Windows PC to the Solaris 10 server. Make sure you copy the file as ‘binary’. In this example, I will copy the CCDT to /export/home/tester/ directory on the Solaris 10 server.
Step #7: On Solaris 10 server, we need set some MQ environment variables:
unset MQSERVER
export MQCHLLIB=/export/home/tester
export MQCHLTAB=BIZI.QM.TST.TAB
Note: MQCHLLIB environment has 2 “L”s so be care when typing it.
And now set MQAUSX environment variables for the User Credentials:
export MQAUSX_UID=tester
export MQAUSX_PWD=abc123
Step #8: On Solaris 10 server, now that the environment variables are set, time to do a test. I will use the amqsputc and amqsgetc MQ sample programs:
Let’s put 1 message on the queue:
/opt/mqm/samp/bin/amqsputc TST1  BIZI.QM.TST
Sample AMQSPUT0 start
target queue is TST1
this is a test message

Sample AMQSPUT0 end
Now, let’s retrieve that message:
 /opt/mqm/samp/bin/amqsgetc TST1  BIZI.QM.TST
Sample AMQSGET0 start
message
no more messages
Sample AMQSGET0 end
That’s it – pretty straightforward. It is very easy to have both channel authentication and message encryption over the channel.
I strongly recommend that people not use MQAUSX_UID and MQAUSX_PWD environment variables but rather use the client-side encrypted file created by the enc_clnt program (see the next blog posting for an example).
Regards,
Roger Lacroix
Capitalware Inc.
The VEQ file format is used by 3 Capitalware products: MQ Visual Edit, MQ Visual Browse and MQ Batch Toolkit to backup and restore messages including MQMD to/from a file.
I was recently asked if I would publish the VEQ layout (something I’ve never done). I know some people have reverse engineered the file layout, so I gave it some thought and figured why not. So, here is the VEQ file layout:
| Name | Type | Size | Example |
| Header | String | 4 | "MQVE" |
| Version | Integer | 4 | 1 |
| Count (messages in the VEQ file) | Integer | 4 | 1 |
Note: The VEQ header only appears once at the beginning of the file.
| Name | Type | Size | Example |
| MD.StrucId | String | 4 | "MD " |
| MD.Version | Integer | 4 | 1 |
| MD.Format | String | 8 | "MQSTR " |
| MD.BackoutCount | Integer | 4 | 0 |
| MD.CCSID | Integer | 4 | 437 |
| MD.Encoding | Integer | 4 | 273 |
| MD.Expiry | Integer | 4 | -1 |
| MD.Feedback | Integer | 4 | 0 |
| MD.MsgSeqNumber | Integer | 4 | 1 |
| MD.MsgType | Integer | 4 | 8 |
| MD.Offset | Integer | 4 | 0 |
| MD.OriginalLength | Integer | 4 | -1 |
| MD.Persistence | Integer | 4 | 1 |
| MD.Priority | Integer | 4 | 0 |
| MD.PutApplType | Integer | 4 | 11 |
| MD.Report | Integer | 4 | 0 |
| MD.MsgFlags | Integer | 4 | 0 |
| MD.DataLength | Integer | 4 | 100 |
| MD.AccountingToken | Byte | 32 | |
| MD.CorrelID | Byte | 24 | |
| MD.GroupID | Byte | 24 | |
| MD.MsgID | Byte | 24 | |
| MD.ApplIdentityData | String | 32 | |
| MD.ApplOriginData | String | 4 | |
| MD.PutApplName | String | 28 | ware\MQ Visual Edit\mqve.exe |
| MD.ReplyToQMgr | String | 48 | MQWT1 |
| MD.ReplyToQ | String | 48 | TEST.Q1 |
| MD.UserID | String | 12 | roger |
| Message Data | Byte | Variable Length (see DataLength field) |
Individual messages are repeated as per the layout above.
Regards,
Roger Lacroix
Capitalware Inc.
More great news. Lyn Elkins of IBM and Barry Lamkin of IBM will be speaking at Capitalware’s MQ Technical Conference v2.0.1.3 (MQTC).
Lyn Elkins will be presenting the following sessions at MQTC:
Barry Lamkin’s session information will be posted next week.
Note: We will do our best to make sure that each session is presented twice.
The schedule now contains 5 rooms holding sessions for the 3 days. Hence, as of now, a total of 70 sessions will be given at MQTC. 🙂
For more information about MQTC, please go to:
http://www.mqtechconference.com
Regards,
Roger Lacroix
Capitalware Inc.
I have updated Capitalware’s MQ Technical Conference v2.0.1.3 (MQTC) schedule to included the following new sessions:
Chris Frank will be presenting the following sessions:
Cressida Technology will be hosting:
Bob Ahrens will be presenting the following sessions:
2 speakers from IBM Hursley. I listed 3 sessions for each speaker. I will fill in the details once I get more information from Leif Davidsen of IBM.
The schedule now has 4 concurrent sessions for each of the 3 days. Therefore, as of right now, over 55 sessions will be given at MQTC.
I am still waiting for 5 more speakers to get official permission to speak at MQTC. Hence, there is a strong possibility of having 5 concurrent sessions during the 3 days – meaning 70 sessions!!
For more information about MQTC, please go to:
http://www.mqtechconference.com
Regards,
Roger Lacroix
Capitalware Inc.
More great news. Chris Frank of IBM will be speaking at Capitalware’s MQ Technical Conference v2.0.1.3 (MQTC). Chris Frank will be presenting the following sessions at MQTC:
Note: We will do our best to make sure that each session is presented twice.
For more information about MQTC, please go to:
http://www.mqtechconference.com
Regards,
Roger Lacroix
Capitalware Inc.